Showing posts with label Studio / Audio Recording Technology. Show all posts
Showing posts with label Studio / Audio Recording Technology. Show all posts
Friday, February 09, 2007
Sound on Sound article
The other day I thought that I had discovered a way to beat the latency issues with LE systems and to use all available physical outputs whilst still in low latency monitoring mode. Sound on Sound magazine were approached and they were keen to read my findings with a view to publishing the article. However, since then I have realised that what I was trying was not really working as I thought it was :(

Further ProTools Problems - finally resolved
Upon finally getting ProTools to install and run, more problems were noticed with the Digi002 RACK audio interface. For some reason, unbeknown to me at the time, every 30s, the 1394 Firewire light would flick on and off and ProTools would stop playing or recording (as it was obviously temporarily losing its communication). After changing Firewire cards with no luck, it was decided to replace the motherboard, CPU and RAM (a bit drastic but the PC was in need of an upgrade any way). After replacing the various bits and reinstalling Windows XP from scratch, the same problem appeared yet again!
After more head scratching, both wired and wirless network adapters were disabled and even without re-starting ProTools, the problem disappeared instantly. More research will be carried out on this, but it is probably down to the network adapters hogging the same IRQ as the Firewire interface? With the network disabled, ProTools runs brilliantly on this new machine (Dual Core 1.8GHz) - as well as any TDM system I have encountered. Even with the playback buffer set to 128 samples, the machine refuses to fall over, meaning that headphone mixes can be set up in what is perceived to be realtime via software sends. The problem with any LE system is the latency encountered which means setting up things such as cue mixes, plugins on live inputs etc., is tricky unless the playback buffer can be reduced sufficiently (as already discussed, the 128 samples option works well). The Digi002 does have a "low latency monitoring" option but this diasbles all sends and mutes all physical outputs apart from 1 and 2 meaning that creating a separate headphone mix is basically impossible. This article in Sound on Sound discusses this further by the way: http://www.soundonsound.com/sos/jun06/articles/ptworkshop_0606.htm.
Finally, the studio is becoming useable - just waiting for the monitors and contol surface.
After more head scratching, both wired and wirless network adapters were disabled and even without re-starting ProTools, the problem disappeared instantly. More research will be carried out on this, but it is probably down to the network adapters hogging the same IRQ as the Firewire interface? With the network disabled, ProTools runs brilliantly on this new machine (Dual Core 1.8GHz) - as well as any TDM system I have encountered. Even with the playback buffer set to 128 samples, the machine refuses to fall over, meaning that headphone mixes can be set up in what is perceived to be realtime via software sends. The problem with any LE system is the latency encountered which means setting up things such as cue mixes, plugins on live inputs etc., is tricky unless the playback buffer can be reduced sufficiently (as already discussed, the 128 samples option works well). The Digi002 does have a "low latency monitoring" option but this diasbles all sends and mutes all physical outputs apart from 1 and 2 meaning that creating a separate headphone mix is basically impossible. This article in Sound on Sound discusses this further by the way: http://www.soundonsound.com/sos/jun06/articles/ptworkshop_0606.htm.
Finally, the studio is becoming useable - just waiting for the monitors and contol surface.
Saturday, February 03, 2007
Update with pictures


Here are some pictures following some work today. Just awaiting the Blue Sky 5.1 monitors and the Mackie Control surface which will take centre stage. All cabling is now in - it just needs a bit of a tidying up. Corner foam bass traps may be installed together with a few more foam tiles behind the monitor position.
Monday, January 29, 2007
Update
Nearly nearly there now - will post some pictures when I get a camera that works properly.
All cabling is now in, with the exception of the instruments / MIDI. Two PCs are in together with all the racking and patch bays, plus all soldering is now complete too.
Spent most of the weekend trying to install ProTools onto a clean install of XP SP2. What a nightmare - it just wouldn't boot up properly. The fault turned out to be that ProTools was unhappy being installed into a partition other than the C: drive. Once all the default paths were used it appeared to open without any problems. It is a pity that the error message displayed discussed an "Assertion Error in ...... code line 242"??? :)
Just all of the other software and plugins to go back on now, together with the speakers and control surface etc.
The booth was tested yesterday by simply recording a voice over and I was very pleased with how dry and quiet the recording was and there was obviously no annoying PC fan noise in the background. A neighbour was revving his motor bike in the ajoining garage and this couldn't be heard at all. One thing that lets the isolation down is the window so clear mastic has been placed around both sides of the perimeter which does appear to have improved things slightly. However, another single pane of glass may be installed vertically on the control room side which should help things out a little too. Also, the void between the inner and outer doorways are going to be lined with foam rubber to help give a little absorption between the void.
All cabling is now in, with the exception of the instruments / MIDI. Two PCs are in together with all the racking and patch bays, plus all soldering is now complete too.
Spent most of the weekend trying to install ProTools onto a clean install of XP SP2. What a nightmare - it just wouldn't boot up properly. The fault turned out to be that ProTools was unhappy being installed into a partition other than the C: drive. Once all the default paths were used it appeared to open without any problems. It is a pity that the error message displayed discussed an "Assertion Error in ...... code line 242"??? :)
Just all of the other software and plugins to go back on now, together with the speakers and control surface etc.
The booth was tested yesterday by simply recording a voice over and I was very pleased with how dry and quiet the recording was and there was obviously no annoying PC fan noise in the background. A neighbour was revving his motor bike in the ajoining garage and this couldn't be heard at all. One thing that lets the isolation down is the window so clear mastic has been placed around both sides of the perimeter which does appear to have improved things slightly. However, another single pane of glass may be installed vertically on the control room side which should help things out a little too. Also, the void between the inner and outer doorways are going to be lined with foam rubber to help give a little absorption between the void.
Monday, January 22, 2007
Update
A quick update - pictures to follow:
The racking is now in place as is some of the wiring to and from the devices / booth and kit. All soldering now complete too.
Most of the weekend was spent fixing the foam acoustic tiles to the entire inside lining of the vocal booth; most of the spray adhesive went up my nose, but at least that job is now complete too.
This weekend, it is hoped that all of the kit will be in place - a Mackie Control has been ordered today to work with Logic / ProTools and Vegas video, together with a Blue Sky 5.1 Media Desk surround monitoring system. The Mackie Control is going to be used in conjunction with a Digi002 Rack ProTools LE system.
The racking is now in place as is some of the wiring to and from the devices / booth and kit. All soldering now complete too.
Most of the weekend was spent fixing the foam acoustic tiles to the entire inside lining of the vocal booth; most of the spray adhesive went up my nose, but at least that job is now complete too.
This weekend, it is hoped that all of the kit will be in place - a Mackie Control has been ordered today to work with Logic / ProTools and Vegas video, together with a Blue Sky 5.1 Media Desk surround monitoring system. The Mackie Control is going to be used in conjunction with a Digi002 Rack ProTools LE system.
Monday, January 15, 2007
Acoustic Foam Tiling
A fantastic place was discovered last night selling packs of acoustic foam wedges which can be used to line the inside of the vocal booth with. Originally it was intended to purchase a pack from Custom Audio Designs, however, their packs cost £295+VAT which would not quite be enough. An alternative place, who sell through ebay stock identical designs - 425 x 425 x 45mm deep wedges for just £32 for a pack of 30. This equates to an approx. coverage of 58 square feet, so two packs have been ordered. The URL is: http://stores.ebay.co.uk/Comfortex-Foam
Sunday, January 14, 2007
Update


Nearly there now - this weekend saw the benching erected, all of the trunking / mains finished and the alarm system installed (courtesy of my brother). The big TV is now on the wall too as is the sky feed - yes that is Coronation Street on the screen :)
Just the tie lines / wall boxes to be soldered now and then kit can go in. Next weekend it is hoped to build 2 x 14U rack cases out of MDF to fit underneathe the benching; once this is done the kit can go in.
Tuesday, January 09, 2007
Update


Almost there now - the trunking was installed at the weekend and back boxes are ready in place. It is hoped that this weekend the mains will be installed and the audio cabling too. The photographs here show the double door arrangment and the trunking installed. The booth will have four TRS lines for headphone feeds / DI etc., together with 4 mic lines one of which will double up as a "listen back" mic socket. Once the benching is then installed, kit can go begin to go in. If budget allows, it is intended to install acoustic tiling in the vocal booth as whilst separation is acceptable, the room rings like anything!
Wednesday, January 03, 2007
Update
A bit of an update:
Doors have now been installed together with 5mm neoprene seals around all perimeters.
Doors have been painted.
LCD TV bracket has been installed ready for big TV :)
It has now been decided to run a cable from the 4 port LNB on the satellite dish on the front of the house and have free satellite in the studio.
Surface mount trunking should be arriving tomorrow so mains should go live very soon together with the alarm system.
Doors have now been installed together with 5mm neoprene seals around all perimeters.
Doors have been painted.
LCD TV bracket has been installed ready for big TV :)
It has now been decided to run a cable from the 4 port LNB on the satellite dish on the front of the house and have free satellite in the studio.
Surface mount trunking should be arriving tomorrow so mains should go live very soon together with the alarm system.
Thursday, December 28, 2006
Update and booth window installation


All of the skirting and architrave is now complete in both the main studio and the booth. Today, the angled, 750 x 750 sealed unit was installed in the booth (28mm deep). The angled pane was achieved by cutting down a 68mm piece of softwood from 50mm at one end down to 18mm at the other, thus forming two triangles which the pane could sit between. 5mm neoprene was also installed around the angled frame, both back and front to create mechanical separation between frame and pane. Prior to installing the architrave around the frame, all gaps were filled with decorator's caulk on both sides to reduce noise transmission as effectively as possible. (see picture).
Friday, December 22, 2006
Thursday, December 21, 2006
Update


A bit of an update on progress made .(apologies for poor picture quality as only had phone on me).
Both rooms are now painted and the laminate floor has been laid throughout. The Utility Room is complete and the new wine cooler fits just perfectly :)
The new fire doors arrived today too ready to be fitted on Saturday 30th December.
All that remains to be done in the studio before the fun wiring bits can commence (AV and mains) is for skirting and architraves to be fitted, window cills painted and the vocal booth window installed.
Wednesday, October 04, 2006
New audio kit to test
Very soon, new HD cameras (Sony Z1), Field Mixers (Sound Devices 302) and Flash Disc recorders (Marantz PMD660) are going to be purchased. Audio tests are going to be carried out and comparisons will be made between this new kit and the poor audio results of the older Sony VX2000 camera. The Sony Z1 has onboard XLR connectors, together with +48VDC Phantom Power, meaning that having to use XLR to 3.5mm mini jack connectors will soon be a thing of the past. As well as testing a microphone directly with the Z1 camera (Sennheiser MKH-416), tests will also be carried out with the Sound Devices 302 mixer used for the front end pre-amplification before the Z1 camera and with the Sound Devices 302 mixer and Marantz PMD-660 recorder. It will be interesting to hear the differences.....
Tuesday, August 22, 2006
First impressions of Sennheiser MKH-416
A Sennheiser MKH-416 was recently purchased together with full Rycote kit and used on an outdoor shoot. Immediately it was apparent just how much better, sonically, this microphone is compared to the K6. Bottom end presence is much greater and the tinny sound of the K6 has gone.
More updates on this will follow when the microphone has been used more extensively.
More updates on this will follow when the microphone has been used more extensively.
Friday, July 21, 2006
An Investigation of using "You Tube" to stream online video content through to Blogger
Blogger itself does not allow the user to upload video content, only still images. By using "You Tube", - http://www.youtube.com it is possible to stream video onto Blogger.
The following is an example of this (courtesy of Simon Perkins, http://en.wikipedia.org/wiki/A_Little_Death:_A_Modern_Day_Fairytale).
The following is an example of this (courtesy of Simon Perkins, http://en.wikipedia.org/wiki/A_Little_Death:_A_Modern_Day_Fairytale).
Thursday, July 20, 2006
ProTools LE and Reason


A recent training session on ProTools was attended and it was observed that using ProTools LE internally "rewired" to Propellerhead's Reason is a really neat all in one solution for music production and editing. Purchasing a Digidesign MBox 2, which ships with ProTools LE, together with Reason is extremely good value (approx. £450), especially for teaching purposes. By creating an Aux. Input track within the ProTools environment enables the Reason instrument to be loaded as an Insert and effectively triggered via a MIDI track. If a stereo track is created, Reason's STEREO output is routed into ProTools, meaning that all individual instruments are sub-mixed within Reason. If a mono track is created, all of Reason's individual outputs (upto 64) can be routed individually into ProTools for further processing.
Reason is also good for teaching audio wiring and routing through its virtual patching system.
Sennheiser MKH-416
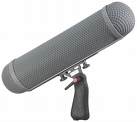
A Sennheiser MKH-416 microphone has just been ordered. The aim is to carry out some simple tests and comparisons with the Sennheiser K66 microphone and the results will be posted on this Blog soon. Audio comparisons have already been listened to through the DV Freelancer website (www.dvfreelancer.com) so it is already acknowledged how much better the 416 sounds, however, it will be most interesting to carry out further tests.
Thursday, July 13, 2006
Shotgun Mics
A fantastic website has just been discovered discussing and demonstrated/comparing a range of different microphones designed for sound for picture. The URL is: http://www.dvfreelancer.com/articles/shotgun_shootout.html
I have only got experience of using the Sennheiser ME66 / K6 shotgun microphone and have never been particularly impressed with it. It sounds incredibly "thin" and tinny even when used up close, so using it from a fair distance to keep it out of shot produces even thinner results. It appears that either the Audio Technica AT4073A (current price approx. £719 at Digital Village) or the Sennheiser MKH-416 (current price approx. £799 at Digital Village) give far far superior results as the link above demonstrates.
I have only got experience of using the Sennheiser ME66 / K6 shotgun microphone and have never been particularly impressed with it. It sounds incredibly "thin" and tinny even when used up close, so using it from a fair distance to keep it out of shot produces even thinner results. It appears that either the Audio Technica AT4073A (current price approx. £719 at Digital Village) or the Sennheiser MKH-416 (current price approx. £799 at Digital Village) give far far superior results as the link above demonstrates.
Tuesday, July 11, 2006
What's the best way to record?
A recent task was carried out to try and answer the following question:
What is the best way to record - low gain setting to minimise hiss from the pre-amp and to provide a large amount of headroom? Or, a higher gain setting to give a higher signal level, less headroom and higher noise floor?
The following equipment was used:
Laptop running Sony Soundforge 7
Edirol UA25 USB Powered 24bit/96kHz Audio Interface
Sennheiser K6 Shotgun Condenser Microphone
Beyer DT100 Headphones
Duvet to help minimise reflections and "room noise"
With Soundforge set to record at standard CD-A quality (i.e. fs=44.1kHz and bit depth = 16), the microphone was connected to the audio interface and Phantom Power was switched on (on the Edirol interface). The microphone and subject were placed under a duvet(!) to help reduce background noise and reflections so that the noise floor was as low as possible; the subject was approx. 30cm from the microphone. With Soundforge recording, the gain setting on the audio interface was firstly set to its minimum position and a count was carried out at normal conversation level, then the same was carried out for a gain of approx. 9 o'clock, 12 o'clock (where clipping started to occur) and finally 3 o'clock which caused severe clipping. Each recording was then analysed (using the Statistics tool) for the peak sample value, RMS level (important as the human hear responds to average level, not peak) and approximate noise floor level (as observed on the dBFS meters) for both non-normalised and normalised versions.
The results are were as follows:
Gain of zero (minimum position)
non-normalised peak sample value: -24.07dBFS
non-normalised RMS value: -39.09dB
non-normalised noise floor level: -54dBFS (approx.)
normalised peak sample value: 0dBFS
normalised RMS value: -16.97dB
normalised noise floor level: -37dBFS (approx.)
Gain set to 9 o'clock position
non-normalised peak sample value: -8.3dBFS
non-normalised RMS value: -27.62dB
non-normalised noise floor level: -54dBFS
normalised peak sample value: 0dBFS
normalised RMS value: -20.33dB
normalised noise floor level: -47dBFS
Gain set to 12 o'clock position
non-normalised peak sample value: -1.24dBFS
non-normalised RMS value: -18.2dB
non-normalised noise floor level: -40dBFS
normalised peak sample value: 0dBFS
normalised RMS value: -17.81dB
normalised noise floor level: -40dBFS
Observations and Conclusions
It must be appreciated that some of these results are only approximate observations. In brief, it can be seen that the best compromise appears to be with the gain setting (in this case) to the 9 o'clock position which gave a good amount of headroom (peak, non-normalised value of -8.3dBFS) with a low level noise floor. Normalising these values gives a S/N ratio of approx. 47dB which isn't too bad considering the acoustic environment of the space used. It is also interesting to note that at a glance, the results aren't that much better than the results for the previous post entitled Quick VX2000 Audio Test Results, however, audibly the recordings were far far superior - much cleaner and with far less noise. This backs up the advantage of using separate high quality recording devices when recording sound for picture.
What is the best way to record - low gain setting to minimise hiss from the pre-amp and to provide a large amount of headroom? Or, a higher gain setting to give a higher signal level, less headroom and higher noise floor?
The following equipment was used:
Laptop running Sony Soundforge 7
Edirol UA25 USB Powered 24bit/96kHz Audio Interface
Sennheiser K6 Shotgun Condenser Microphone
Beyer DT100 Headphones
Duvet to help minimise reflections and "room noise"
With Soundforge set to record at standard CD-A quality (i.e. fs=44.1kHz and bit depth = 16), the microphone was connected to the audio interface and Phantom Power was switched on (on the Edirol interface). The microphone and subject were placed under a duvet(!) to help reduce background noise and reflections so that the noise floor was as low as possible; the subject was approx. 30cm from the microphone. With Soundforge recording, the gain setting on the audio interface was firstly set to its minimum position and a count was carried out at normal conversation level, then the same was carried out for a gain of approx. 9 o'clock, 12 o'clock (where clipping started to occur) and finally 3 o'clock which caused severe clipping. Each recording was then analysed (using the Statistics tool) for the peak sample value, RMS level (important as the human hear responds to average level, not peak) and approximate noise floor level (as observed on the dBFS meters) for both non-normalised and normalised versions.
The results are were as follows:
Gain of zero (minimum position)
non-normalised peak sample value: -24.07dBFS
non-normalised RMS value: -39.09dB
non-normalised noise floor level: -54dBFS (approx.)
normalised peak sample value: 0dBFS
normalised RMS value: -16.97dB
normalised noise floor level: -37dBFS (approx.)
Gain set to 9 o'clock position
non-normalised peak sample value: -8.3dBFS
non-normalised RMS value: -27.62dB
non-normalised noise floor level: -54dBFS
normalised peak sample value: 0dBFS
normalised RMS value: -20.33dB
normalised noise floor level: -47dBFS
Gain set to 12 o'clock position
non-normalised peak sample value: -1.24dBFS
non-normalised RMS value: -18.2dB
non-normalised noise floor level: -40dBFS
normalised peak sample value: 0dBFS
normalised RMS value: -17.81dB
normalised noise floor level: -40dBFS
Observations and Conclusions
It must be appreciated that some of these results are only approximate observations. In brief, it can be seen that the best compromise appears to be with the gain setting (in this case) to the 9 o'clock position which gave a good amount of headroom (peak, non-normalised value of -8.3dBFS) with a low level noise floor. Normalising these values gives a S/N ratio of approx. 47dB which isn't too bad considering the acoustic environment of the space used. It is also interesting to note that at a glance, the results aren't that much better than the results for the previous post entitled Quick VX2000 Audio Test Results, however, audibly the recordings were far far superior - much cleaner and with far less noise. This backs up the advantage of using separate high quality recording devices when recording sound for picture.
Quick VX2000 Audio Test Results
Further to the previous post on the audio performance of the VX2000, a quick and simple test was carried out to establish some data. A Sennheiser K6 microphone was connected to the camera (battery powered obviously as the VX provides no phantom power option), and held approx. 30cm from the subject. The gain on the camera was set to manual mode and set to its minimum position. Then, with the camera set to record, a simple count, at normal conversation level, was spoken into the microphone. This was repeated with the manual gain set to 2 clicks up, 4 clicks up, 6 clicks up and finally 8 clicks up, which resulted in clipping (i.e. hitting or surpassing the 0dBFS level on the camera).
The camera was then connected to a laptop PC via Firewire and the audio "footage" was captured into Premiere Pro. It was obviously important to use a digital transfer into the PC so as not to add any gain or attenuation to the signal. The audio was then exported as a wave file using standard DV settings (fs=48kHz and bit depth = 16) and then loaded into Sony Soundforge 7. The signal was monitored from the PC on a pair of Beyer DT100 headphones connected to an Edirol UA25 audio interface and immediately upon playback it was noticeable just how much hiss there was on the recording, even with the gain in its minimum position. The files were approximately analysed by observing the peak levels on the dBFS meters within Soundforge for both the noise floor and for the recorded speech for each of the gain settings; the results are shown here:
0 clicks:
Noise floor: approx. -49.5dBFS
Peak of recording: approx. -11dBFS
Approximate S/N Ratio: 38.5dB
2 clicks:
Noise floor: approx. -43.8dBFS
Peak of recording: approx. -11dBFS
Approximate S/N Ratio: 31.8dB
4 clicks:
Noise floor: approx. -40.6dBFS
Peak of recording: approx. -7.1dBFS
Approximate S/N Ratio: 33.5dB
6 clicks:
Noise floor: approx. -36.8dBFS
Peak of recording: approx. -2.1dBFS
Approximate S/N Ratio: 34.7dB
8 clicks:
Noise floor: approx. -39dBFS
Peak of recording: approx. 0dBFS (and above)
Approximate S/N Ratio: 39dB
Observations and Conclusions:
It is important to note that these are approximate measurements and that the room used to carry out the recordings in was not acoustically treated in any way. Therefore, the background noise level was fairly high and factors such as traffic noise from the nearby road needs to be taken into account. However, audibly, the noise floor was very high on all settings resulting in a poor S/N ratio. There was also some occasional low level clicks and pops throughout the recordings too. It is also interesting to note that the approximate S/N Ratio hardly changed regardless of manual gain position on the camera, therefore one would suggest that when using this camera to record audio with, perhaps a low gain setting is equally as good as a high one? Peaking a low as -11dBFS is fine when recording DV audio (as already discussed elsewhere, some texts state that DV audio can peak as low as -20dBFS to allow for 20dB headroom), and the audio file could always be normalised to bring the peak level up in the edit any way. Whatever the gain position, the recording quality is compromised by the high noise levels which isn't masked particularly well by the signal.
Some further articles of interest are:
http://www.dvfreelancer.com/articles/vx2000.html
http://www.gregjwinter.com/compare.htm
The camera was then connected to a laptop PC via Firewire and the audio "footage" was captured into Premiere Pro. It was obviously important to use a digital transfer into the PC so as not to add any gain or attenuation to the signal. The audio was then exported as a wave file using standard DV settings (fs=48kHz and bit depth = 16) and then loaded into Sony Soundforge 7. The signal was monitored from the PC on a pair of Beyer DT100 headphones connected to an Edirol UA25 audio interface and immediately upon playback it was noticeable just how much hiss there was on the recording, even with the gain in its minimum position. The files were approximately analysed by observing the peak levels on the dBFS meters within Soundforge for both the noise floor and for the recorded speech for each of the gain settings; the results are shown here:
0 clicks:
Noise floor: approx. -49.5dBFS
Peak of recording: approx. -11dBFS
Approximate S/N Ratio: 38.5dB
2 clicks:
Noise floor: approx. -43.8dBFS
Peak of recording: approx. -11dBFS
Approximate S/N Ratio: 31.8dB
4 clicks:
Noise floor: approx. -40.6dBFS
Peak of recording: approx. -7.1dBFS
Approximate S/N Ratio: 33.5dB
6 clicks:
Noise floor: approx. -36.8dBFS
Peak of recording: approx. -2.1dBFS
Approximate S/N Ratio: 34.7dB
8 clicks:
Noise floor: approx. -39dBFS
Peak of recording: approx. 0dBFS (and above)
Approximate S/N Ratio: 39dB
Observations and Conclusions:
It is important to note that these are approximate measurements and that the room used to carry out the recordings in was not acoustically treated in any way. Therefore, the background noise level was fairly high and factors such as traffic noise from the nearby road needs to be taken into account. However, audibly, the noise floor was very high on all settings resulting in a poor S/N ratio. There was also some occasional low level clicks and pops throughout the recordings too. It is also interesting to note that the approximate S/N Ratio hardly changed regardless of manual gain position on the camera, therefore one would suggest that when using this camera to record audio with, perhaps a low gain setting is equally as good as a high one? Peaking a low as -11dBFS is fine when recording DV audio (as already discussed elsewhere, some texts state that DV audio can peak as low as -20dBFS to allow for 20dB headroom), and the audio file could always be normalised to bring the peak level up in the edit any way. Whatever the gain position, the recording quality is compromised by the high noise levels which isn't masked particularly well by the signal.
Some further articles of interest are:
http://www.dvfreelancer.com/articles/vx2000.html
http://www.gregjwinter.com/compare.htm
Subscribe to:
Posts (Atom)